Ruan BeukesI'm Ruan Beukes, the author of this blog and a friendly web developer. I love new technology and enjoy life! When I'm not coding, I spend time with my family and every so often go down to the ballpark to hit a few homeruns.2023-03-25T06:45:35.702Zhttps://ruanbeukes.net/Ruan BeukesHexoVerify a Specific Node Version for Your JavaScript Projecthttps://ruanbeukes.net/Verify-a-specific-node-version-for-your-javascript-project/2021-09-07T18:00:00.000Z2023-03-25T06:45:35.702ZProblem
I recently had a situation where I needed to make sure the correct version of node is installed before one runs npm install. This is because one of the packages in our project has a dependency on a specific node version.
Another challenge was that I should still be able to work on multiple projects, each with their own node version dependency.
My mission is clear, let the games begin…
Solution
nvm
To address the issue of running multiple versions of node on one machine, use nvm (Node Version Manager).
nvm is a version manager for node.js, designed to be installed per-user, and invoked per-shell.
I needed a windows version, and the nvm Readme.md pointed me to nvm-windows (Download nvm-setup.zip).
Similar (not identical) to nvm, but for Windows.
check-node-version
To verify the node version per JavaScript project, I found this npm package check-node-version. It allows you to verify the node version via CLI (Command Line Interface) or programmatically. I used both ways, just because I had two projects with different requirements.
Verify node version via CLI
I used this approach on a project where the project could not even install packages if you had an incorrect node version. I had to check the node version without having the luxury of npm install.
How do one use a npm package without executing npm install? … npx
This command allows you to run an arbitrary command from an npm package (either one installed locally, or fetched remotely), in a similar context as running it via npm run.
Steps to check node version between v10.x (including) and v11.0.0 (excluding)
use engines in your package.json to add a specific node version, or a range, to your project.
if (result.isSatisfied) { console.log("All is well."); return; }
console.error("Some package version(s) failed!");
for (const packageName ofObject.keys(result.versions)) { if (!result.versions[packageName].isSatisfied) { console.error(`Missing ${packageName}.`); } } }
With the knowledge of nvm, I’ve update check_node_version.js with some instruction to install and use nvm. Give your dev team instructions on how to solve the problem, they will love you for it. 😁
check_node_version.js: An example of the version check with instructions to solve the issue for windows users…
When you run npm install, the preinstall will execute requirements-check, and when all is good it will continue installing the project packages. If the node verification failed, the packages will not be installed.
Verify node version programmatically
install check-node-version as a dev dependency:
1
npm install check-node-version -D
use engines in your package.json to add a specific node version, or a range, to your project.
When you run npm install, your packages will be installed first, and after that postinstall will execute requirements-check to verify the correct node version.
One dream I have to even make this better, is to show the instructions with an added question: Would you like to download nvm and install the missing node version? [Y]es / [N]o. (There is some homework for you )
Final thoughts
When you add any breaking changes to your codebase, I believe it is your responsibility to help your teammates to fall into the pit of success without any cognitive overload.
]]>
<h2 id="Problem"><a href="#Problem" class="headerlink" title="Problem"></a>Problem</h2><p>I recently had a situation where I needed to make
Parallels Desktop for Mac - Automatically Map a Drive With Administrator Privilegeshttps://ruanbeukes.net/Parallels-Desktop-for-Mac-Automatically-map-a-drive-with-administrator-privileges/2020-06-26T21:06:54.000Z2023-03-25T06:45:35.698ZI’ve been using Windows my whole life.
Then, in 2018, I made the jump to Mac. In order to save me a bit of trouble I invested in Parallels Desktop for Mac to support clients with .NET systems.
Problem
I needed my Parallels Windows Virtual Machine to access some files which lives on my Mac drive as Y:\.
When I run the Command Prompt without admin rights, everything works as advertised:
C:\WINDOWS\system32>y: The system cannot find the drive specified. C:\WINDOWS\system32>
Solution
Create a batch file MapMacDrive.bat on your Windows drive:
1 2 3
net use y: \\Mac\Home @echo \\Mac\Home should now be mapped and available for Administrator use too. pause
Right click on MapMacDrive.bat and run as Administrator:
1 2 3 4 5 6 7
C:\WINDOWS\system32>net use y: \\Mac\Home The command completed successfully.
\\Mac\Home should now be mapped and available for Administrator use too.
C:\WINDOWS\system32>pause Press any key to continue . . .
Side note, to delete the drive create a batch file MapMacDriveDelete.bat and run as Administrator:
1 2
net use y: /delete pause
Automate mapping on Windows restart
On a Windows restart, the mapped drive is gone and you’ll have to manually run the batch file again…not good enough.
I automate this by using the Windows Task Scheduler.
Open a run box by pressing Windows Key + R, then execute taskschd.msc. Look for the Create Task action on the right panel.
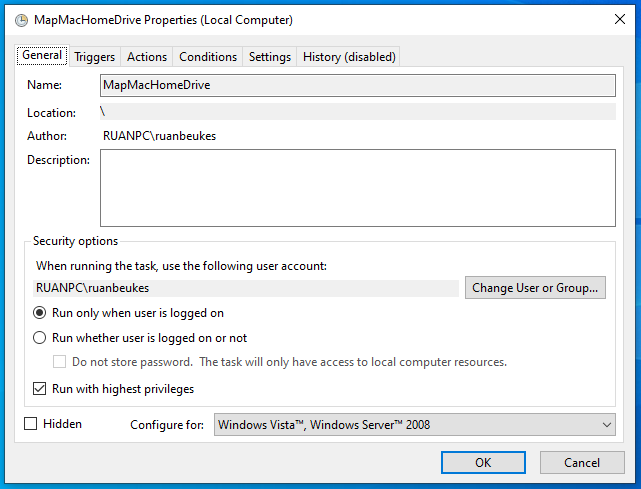
Create a new task MapMacHomeDrive with…
General Tab
Make sure to select Run with highest privileges.
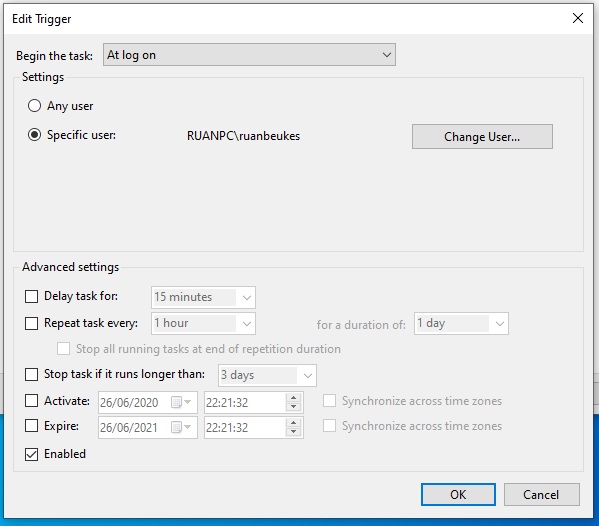
Trigger Tab
Create a new Trigger which will run At log on.
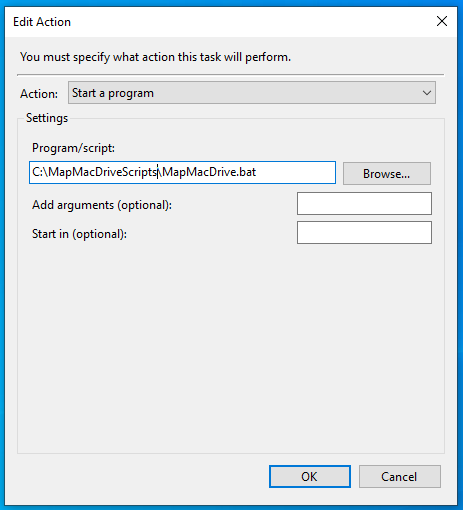
Actions Tab
Create a new Action which will run the batch file.
Your drive will automagically be mapped on restart.
Use it…don’t use it :)
]]>
<p>I’ve been using Windows my whole life.</p>
<p>Then, in 2018, I made the jump to Mac.<br>In order to save me a bit of trouble I invested i
Angular Typesafe Reactive Forms Helperhttps://ruanbeukes.net/Angular-Typesafe-Reactive-Forms-Helper/2020-03-29T19:22:17.000Z2023-03-25T06:45:35.698ZOct 2017 I wrote a post - Angular Typesafe Reactive Forms.
A few people started using the implementation and also suggested enhancements.
We started sharing code in the blog’s comments, then later I moved the code into a github gist angular-reactive-forms-helper.ts. At least the gist file is one step better than comments, right? :)
Then, early last week one of my mates contacted me with a change request. He created the suggested change in a gist file and shared it with me. I then updated his changes into my gist.
I had enough, this thing should be Open Source so that everyone can contribute.
It only took me two and a half years to finally move the code to github…LOL
Thus, npm package angular-typesafe-reactive-forms-helper was born.
PS: Hope you and your families keep safe during this crazy COVID-19 times. We will get through this.
]]>
<p>Oct 2017 I wrote a post - <a href="https://ruanbeukes.net/angular-typesafe-reactive-forms/">Angular Typesafe Reactive Forms</a>.</p>
<p>A
How I Discovered Monkey Patching While Mocking AWS Cognito in an Angular Apphttps://ruanbeukes.net/How-I-Discovered-Monkey-Patching-While-Mocking-AWS-Cognito-in-an-Angular-App/2019-11-17T20:00:17.000Z2023-03-25T06:45:35.698ZI’ve been using AWS Cognito as the authentication piece to give users access to an Angular web project I’m working on. Everything worked as advertised and I was happy with the result, until I started testing my authentication service. That’s when things got interesting and I could not create a spy object on any of the Cognito classes.
Instead, I got…
1 2 3 4 5 6 7 8 9 10
AuthenticationService when .signInUser is working normally instantiate cognito AuthenticationDetails with correct user credentials FAILED Error: <spyOn> : AuthenticationDetails is not declared writable or has no setter Usage: spyOn(<object>, <methodName>) at <Jasmine> at UserContext.<anonymous> (http://localhost:9876/_karma_webpack_/src/shared/services/auth/authentication.service.spec.ts:33:40) at ZoneDelegate.invoke (http://localhost:9876/_karma_webpack_/node_modules/zone.js/dist/zone-evergreen.js:359:1) at ProxyZoneSpec.push../node_modules/zone.js/dist/zone-testing.js.ProxyZoneSpec.onInvoke (http://localhost:9876/_karma_webpack_/node_modules/zone.js/dist/zone-testing.js:308:1) at ZoneDelegate.invoke (http://localhost:9876/_karma_webpack_/node_modules/zone.js/dist/zone-evergreen.js:358:1) at Zone.run (http://localhost:9876/_karma_webpack_/node_modules/zone.js/dist/zone-evergreen.js:124:1) at runInTestZone (http://localhost:9876/_karma_webpack_/node_modules/zone.js/dist/zone-testing.js:561:1)
Quick Answer
Turns out you need to use Object.defineProperty and modify the property to be writable: true.
1 2 3 4 5 6 7 8
import * as AWSCognito from'amazon-cognito-identity-js';
In my case, Angular Monkey patched amazon-cognito-identity-js and the result is we can execute Object.defineProperty without TypeError: Cannot redefine property: AuthenticationDetails.
Mocking AWS Cognito is simple, now that I know :)
Code examples on how to mock AWS Cognito in Angular.
What is Object.defineProperty
Object.defineProperty is a function which is natively present in the Javascript runtime environment and takes the following arguments:
1
Object.defineProperty(obj, prop, descriptor)
With Object.defineProperty, one defines a new property directly on an object or modifies an existing property on an object.
In Javascript, standard properties (data member with getter and setter) are defined by accessor descriptor. Exclusively, you can use data descriptor (so you can’t use value and set on the same property):
accessor descriptor = get + set
get must be a function; its return value is used in reading the property; if not specified, the default is undefined, which behaves like a function that returns undefined.
set must be a function; its parameter is filled with Right Hand Side in assigning a value to property; if not specified, the default is undefined, which behaves like an empty function.
data descriptor = value + writable
value default undefined; if writable, configurable and enumerable (see below) are true, the property behaves like an ordinary data field.
writable - default false; if not true, the property is read only; attempt to write is ignored without error**
Both descriptors can have these members:
configurable - default false; if not true, the property can’t be deleted; attempt to delete is ignored without error**
enumerable - default false; if true, it will be iterated in for(var i in theObject); if false, it will not be iterated, but it is still accessible as public.
(** unless in strict mode - in that case javascript stops execution with TypeError unless it is caught in try-catch block)
In my case, I actually marked the Cognito.AuthenticationDetails constructor function as overridable (writable). But, you can only do that if configurable: true.
AuthenticationService when .signInUser is working normally instantiate cognito AuthenticationDetails with correct user credentials FAILED Error: <spyOn> : AuthenticationDetails is not declared writable or has no setter Usage: spyOn(<object>, <methodName>) at <Jasmine> at UserContext.<anonymous> (http://localhost:9876/_karma_webpack_/src/shared/services/auth/authentication.service.spec.ts:33:40) at ZoneDelegate.invoke (http://localhost:9876/_karma_webpack_/node_modules/zone.js/dist/zone-evergreen.js:359:1) at ProxyZoneSpec.push../node_modules/zone.js/dist/zone-testing.js.ProxyZoneSpec.onInvoke (http://localhost:9876/_karma_webpack_/node_modules/zone.js/dist/zone-testing.js:308:1) at ZoneDelegate.invoke (http://localhost:9876/_karma_webpack_/node_modules/zone.js/dist/zone-evergreen.js:358:1) at Zone.run (http://localhost:9876/_karma_webpack_/node_modules/zone.js/dist/zone-evergreen.js:124:1) at runInTestZone (http://localhost:9876/_karma_webpack_/node_modules/zone.js/dist/zone-testing.js:561:1)
Life was good and I continued working until the voice inside my head whispered:
“Why is this working…?”
Node behaves different to Angular
Although the chances of using a front-end library (amazon-cognito-identity-js) in a node.js server application is very low, I’ve created a quick test in node.js just to proof a point.
The test is following exactly what I’ve done in Angular, but without the extra package dependencies from Angular.
My investigation revealed Object.getOwnPropertyDescriptor(AWSCognito, 'AuthenticationDetails') returns configurable: false.
This is proof that AWS Cognito library is shipped with configurable: false.
Because it returns false, one would not be able to execute Object.defineProperty without an exception. The AWS team does not want you to fiddle with their implementation of AWSCognito.AuthenticationDetails.
describe('Investigaste Object.defineProperty of AWSCognito.AuthenticationDetails', () => { it('It should throw "TypeError: Cannot redefine property: AuthenticationDetails" because Object.getOwnPropertyDescriptor returns configurable: false', () => { console.log('Object.getOwnPropertyDescriptor(AWSCognito, "AuthenticationDetails"): '); console.log(Object.getOwnPropertyDescriptor(AWSCognito, 'AuthenticationDetails'));
// this will throw exception because of 'configurable: false', // meaning the AWS team does not want you to fiddle with this...and I agree, you shouldn't. Object.defineProperty(AWSCognito, 'AuthenticationDetails', { writable: true, value: 'foo' }); console.log(Object.getOwnPropertyDescriptor(AWSCognito, 'AuthenticationDetails')); });
Randomized with seed 26638 Started Object.getOwnPropertyDescriptor(AWSCognito, "AuthenticationDetails"): { get: [Function: get], set: undefined, enumerable: true, configurable: false } F
Failures: 1) Investigaste Object.defineProperty of AWSCognito.AuthenticationDetails It should throw "TypeError: Cannot redefine property: AuthenticationDetails" because Object.getOwnPropertyDescriptor returns configurable: false Message: TypeError: Cannot redefine property: AuthenticationDetails Stack: at <Jasmine> at UserContext.it (/Users/ruanbeukes/repos/MockCognitoInAngular/node-property-descriptor-investigation/test.spec.js:11:12) at <Jasmine> at runCallback (timers.js:705:18) at tryOnImmediate (timers.js:676:5)
1 spec, 1 failure Finished in 0.011 seconds Randomized with seed 26638 (jasmine --random=true --seed=26638)
I’m confused…I’m sure in my Angular test, before the property modification code, I logged the exact same thing and the result was configurable: true.
How is that possible?!
Angular’s Zone.js and Monkey patching
Angular uses zone.js to handle change detection. Because we have async code, Angular will Monkey patch all async APIs in order to managed the change detection. (See resources below for a more in-depth look at zone'js as it does more than just change detection, it also helps with debugging)
What is Monkey patching? By definition, Monkey patching is basically extending or modifying the original API. Now, zone.js re-defines all the async APIs like browser apis which includes set/clearTimeOut, set/clearInterval, alert, XHR apis etc.
amazon-cognito-identity-js will be re-defined by zone.js and also define the properties as configurable: true. Because it sets configurable: true, it explains why I can define/modify object properties in the Angular world but not in the node.js world.
Below is the code that changes configurable: false to configurable: true from zone-evergreen.js.
1 2 3 4 5 6 7 8 9 10 11 12 13 14 15 16 17 18 19
functionrewriteDescriptor(obj, prop, desc) { // issue-927, if the desc is frozen, don't try to change the desc if (!Object.isFrozen(desc)) { /******** Ruan: This is where Angular does something different compared to node.js **/ desc.configurable = true; /************************************************************************************/ } if (!desc.configurable) { // issue-927, if the obj is frozen, don't try to set the desc to obj if (!obj[unconfigurablesKey] && !Object.isFrozen(obj)) { _defineProperty(obj, unconfigurablesKey, { writable: true, value: {} }); } if (obj[unconfigurablesKey]) { obj[unconfigurablesKey][prop] = true; } } return desc; }
Here is the stack trace when I’ve added a conditional breakpoint prop === 'AuthenticationDetails':
]]>
<p>I’ve been using <a href="https://aws.amazon.com/cognito/" target="_blank" rel="noopener">AWS Cognito</a> as the authentication piece to g
Create and Push Your Local Git Repository With Command Line Tool - Hubhttps://ruanbeukes.net/Create-and-push-your-local-git-repository-with-command-line-tool-hub/2019-10-13T14:11:22.000Z2023-03-25T06:45:35.698ZWhat is hub (hub source)?
hub is an extension to command-line git that helps you do everyday GitHub tasks without ever leaving the terminal.
Why do I need hub?
It saved me the trouble to sign into Github, create the repository manually, just so I can clone it and work locally.
Current Workflow
Usually when I start a new Github repository, I’ll sign in and then create the new repository. The repository will then show me instructions on how to clone, HTTPS or SSH. Depending on my setup, I’ll clone and start coding.
My Use Case
I started a small throw-away-project, with a local git repository. A few hours later, I decided that the code might be useful and I wanted to formally push it to a remote source control server like Github.
My dream was to drop to the terminal and git -u origin master, that should create and push my local repository to my Github account…of course it is not that simple :)
I searched for a github cli tool and hub came up. It runs on macOS, Linux, Windows and a few others.
After I installed it, these are the steps I followed to create and push my local repository:
Open terminal and navigate to source code.
Enter: hub create
hub requested my github username. hub requested my github password. hub requested my Two-factor authentication code.
After the hub create command, I had a repository in Github…magic :)
git push -u origin master (yes, my dream line becomes a reality)
I also received a Github email notification: [GitHub] A personal access token has been added to your account
Conclusion
Although I only used the create command, I would encourage you to check out the hub manual for more interesting commands.
These two commands are the magic:
hub create git push -u origin master
Use it…don’t use it :)
]]>
<p>What is <a href="https://hub.github.com" target="_blank" rel="noopener">hub</a> (<a href="https://github.com/github/hub" target="_blank"
My "Reading" Celebrations 2019https://ruanbeukes.net/Reading-Celebrations/2019-09-22T19:23:29.000Z2023-03-25T06:45:35.698ZSeptember 2018, exactly a year ago, I got this crazy idea to read one book a month for the next year. It is crazy because I’m not really your A+ student and I can always find something better to do, like sleeping, before I’ll read for fun :) The only time you’ll find me reading is when I’m doing some research on a coding problem or when I’m learning some new tech to put into practice.
Basically, I read for educational purposes…not for fun :)
Which brings me to my next problem, how do one hack the system if you don’t like reading?
You turn to audio books.
I signed up for an Amazon Audible account and started “reading” away. It’s a subscription model and your monthly fee provides you one book a month.
I vowed not to sacrifice my family’s time and added my own rule: Listen only on my daily commute to work. That is, 30-35 minutes of learning pleasure a day, 5 days a week.
I set out to find anything to drive my career forward, topics like: people and success, body language, goal setting, negotiation skills and leadership.
I was very focused…first month, done. Second month, done. Third month, something odd is happening…
The longer my journey continued, the more I discovered all these things I thought would drive my career, actually helped me more in my personal life. I realised all the extra time I put in was an investment into my family. It helped me be a better husband, dad and just be a better person in general.
Books
Below is a list of the books I read. I’m not going to give you a book review, you can read the review on Amazon :) Instead, I’ll highlight parts which I found useful in my life.
This book addressed my self doubt and changed my thinking to: I can do it. In fact, it pushed me to apply for a job I would never have considered before…and I got the job :)
You can apply this book to all aspects of your life. I applied some of the principles on my kids and was pleasantly surprised :) Word of caution, there is a fine line between influence and manipulation. Use your super power for good.
Two US Marines sharing their leadership knowledge and how to apply the same principles in your business. I later used some of those principles in my own life.
One bold statement from this book which might trigger interest:
Helped me on all aspects of my life! I would strongly advise to give this one a spin. It helps with handling those uncomfortable conversations. I found it very useful in everyday life.
Planning and setting goals. Of course there are more than just those two points, but they are my key focus points. A bit long but worked my way thought it.
It’s from an ex-FBI agent sharing years of experience on attracting and winning people over. I liked this one very much, it helped me to be a better person and to put others first.
How anyone can master the art and science of personal magnetism. This one helped me with a few ideas on public speaking. It also pushed me to sign up for my first public speaking event…even though it was just 5 minutes :)
The surprising truth about what motivates us. As always, Dan Pienk likes to use science to explain all his findings. This helped me on all aspects of life, work and family life.
An ex-FBI agent sharing some principles when he was a hostage negotiator. Fantastic book and I apply the principles daily at work and at home. It totally changed my point of view when you ask a question and the answer is “no”. The word “no”, is the beginning of the negotiation.
It also helped negotiating my kids into bed :)
We all negotiate everyday, you don’t have to like it, you just have to accept it.
Rating
Description
(A)
Awesome and enjoyed it a lot
(PG)
Pretty good
(G)
Good
Celebrations
Today I celebrate the completion of my personal goal I set 12 months ago. If I can do it, so can you! It does not have to be books, identify your own interest and commit to it for a year. You will surprise yourself.
Final thought
I believe life is about relationships, and I strive to treat anyone with respect regardless their social status or background. These books just highlighted my own believes again.
Use it…don’t use it :)
]]>
<p>September 2018, exactly a year ago, I got this crazy idea to read one book a month for the next year.<br>It is crazy because I’m not real
Netlify - Add Google Analytics to Hexo on Production-Deploy but Not on Branch-Deployhttps://ruanbeukes.net/Netlify-Add-Google-Analytics-to-Hexo-on-Production-deploys-but-not-on-Branch-deploys/2019-07-26T09:15:37.000Z2023-03-25T06:45:35.698ZHow would you know if your website is seen or used? Google Analytics.
For a while I’ve been using Google Analytics to track my blog. It’s free and it gives me insight on which blog post others find interesting too. But…I’ve been doing it wrong.
Tools and Workflow
My blog framework is Hexo and I have Continuous Deployment working with the help of Netlify. When I commit code to master branch, my blog will automatically deploy for your viewing pleasure. On feature branches, which represents a new post, I configured Netlify’s Branch-Deploy to make my draft post available via a special URL. I like the Branch-Deploy feature, as I can quickly share it with a friend to get feedback but more importantly, I can compare how the webpage renders on different devices.
Assuming you have a Universal Analytics tracking ID (UA number), adding GA to Hexo blog is very simple. (If you don’t have a UA number, see resources below to create one)
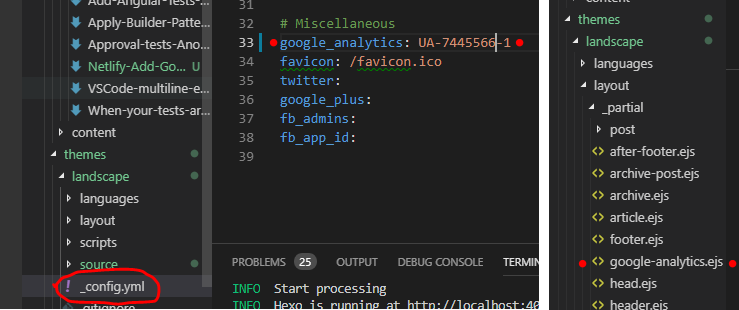
Just add your Universal Analytics (UA) number to your theme’s ../themes/[YourThemeName]/_config.yml file, and also add a new ../themes/[YourThemeName]/layout/_partial/google_analytics.ejs file to Hexo.
After I’ve added GA to my blog, and I browsed the Branch-deploy URL (the test site), I realised GA recorded it as a real-time-active user.
I don’t want any stats recorded when I’m in Test/Draft, I’m only interested in Production stats…oops :)
My mission
How to get Hexo to generate Google Analytics (GA) on Production deployments only.
A quick hexo generate revealed when I remove UA number from the _config.yml, Hexo will remove all GA code from the pages too.
1 2
# Miscellaneous google_analytics:
I figured, if I can use Environment Variables to represent the Google Analytics UA tracking number, I would be able add the UA number to the _config.yml for Production deployments and remove it on Branch deployments.
My Solution
After a few minutes in the Netlify documentation, I discovered the awesome Stream Editor linux command sed. This command will search and replace file content.
Now I have all the info to solve my issue.
Add GA_UA_PLACEHOLDER place holder text in the _config.yml which will be replaced on deployment.
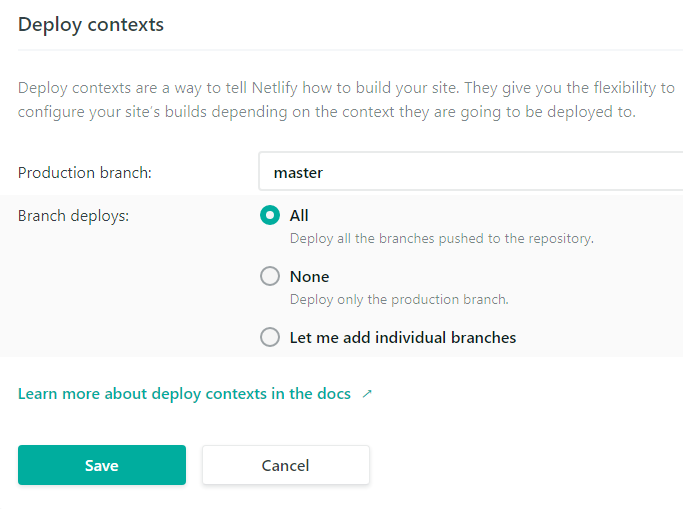
[context.production]: All steps under this section will execute when commit was detected on master branch.
environment = { GA_UA_PLACEHOLDER = "UA-7445566-1" }: Will set Environment Variable GA_UA_PLACEHOLDER to UA-7445566-1 when changes detected on master.
[context.branch-deploy]: All steps under this section will execute when commit was detected on any feature branch.
environment = { GA_UA_PLACEHOLDER = "" }: Will set Environment Variable GA_UA_PLACEHOLDER to empty string when changes detected on feature deployment.
printenv: Will list all the Environment Variables, just a debug thing I do :)
sed -i s/GA_UA_PLACEHOLDER/${GA_UA_PLACEHOLDER}/g ./themes/landscape/_config.yml: Will take _config.yml file as input and search for all occurrences of GA_UA_PLACEHOLDER and replace it with Environment Variable ${GA_UA_PLACEHOLDER}.
cp ../_headers.txt public/_headers: Will copy branch specific header file _header.txt to public folder with filename _headers, so that Netlify can apply the headers.
After these changes, the head section on each page for feature branches were GA free. For master commits, the GA “magically” appeared. Finally, my stats will reflect reality.
Use it…don’t use it :)
PS: Please feel free to leave a comment on how to improve this approach.
]]>
<p>How would you know if your website is seen or used? Google Analytics.</p>
<p>For a while I’ve been using Google Analytics to track my blo
Approval Tests - Another Tool for My Software Test Belthttps://ruanbeukes.net/Approval-tests-Another-tool-for-my-software-test-belt/2019-06-29T17:10:00.000Z2023-03-25T06:45:35.686Z(Tech: C#)
Problem
I was working on a project where we refactored a particular class. The class had a .Get() function, returning an Object. Our mission was to implement a new class with the same .Get(), but the returning Object’s data would be retrieved differently. This is a classic refactor, and thank goodness the team before us had sufficient unit tests :)
The unit tests were very easy to follow and with a few tweaks we had it implemented in no time.
Our next step was to implement integration tests. This would definitely boost our confidence in our changes by comparing the old implementation to the new implementation’s result.
But how can I compare the objects without a lot of work from our team?
Plan of Attack
My plan was to serialize the objects to JSON string, and then compare the string results - see example below. I would depend on the very popular Newtonsoft.Json to make it happen.
// Don't think too much when you see the example, // it's aimed to be very simple to get the point across :)
using Newtonsoft.Json;
// Xunit(pick your poison, MSTest, NUnit) integration test might look something like this: publicclassAddressRepositoryTests { [Fact] publicvoidCompareOldAddressRepoWithNewAddressRepoTest() { // arrange var oldAddressRepository = new OldAddressRepository(); var newAddressRepository = new OldAddressRepository();
// act var oldAddresses = oldAddressRepository.Get(); var newAddresses = oldAddressRepository.Get();
This approach achieved the objective, and if I had automated integration tests running as part of my build pipeline, this would have been good enough.
In our case, we did not run the integration tests on every commit as we only needed a temporary test solution to prove our changes were working. At a certain point, when we were confident our code works, the plan was to remove the old implementation completely.
We also used Scientist.net to test in production…wait…WHAT!!! Before you jump up and down, we are not testing in production :) With Scientist.net, the old code will still executes but the new code will run as an experiment in production. But that’s for another day :)
Back to my test scenario - because we ran our integration test on demand, I have found it difficult to track the difference in the output generated by the assertion tool, in my case Shouldly.
This was not a shortcoming of Shouldly, rather the Object returned was complex and the JSON string value returned was just to big.
My solution was to copy the oldAddressesJSON result into a file, and repeat the same thing with the newAddressesJSON so that I can compare the two files with a diff tool like P4Merge. (Choose your Diff tools for Window or Mac - Kudos to Tobias Günther).
I found it easier to compare the result side-by-side via a diff tool as opposed to a text blob list from top to bottom in the generated output string. I preferred good old fashioned eyeballing the differences :)
Very soon I got bored with the copy-text-to-file and started thinking of a better way…
One of my team mates dropped Approval Tests, and I quickly spiked it.
It makes testing easier when one needs to eyeball the differences. ApprovalTests.Net uses your default installed diff tool, in my case P4Merge, to show the differences visually. I had it up and running very quickly just by looking at their examples.
The magic attribute is: [UseReporter(typeof(DiffReporter))].
var jsonAddress = JsonConvert.SerializeObject(address); Approvals.VerifyJson(jsonAddress); // Verify specific things, in our case JSON.
/* //Another approach would be to use `Approvals.Verify(jsonAddress)`, //which is just a string compare. //The "disadvantage" with this approach is; //one has to format your json result with 'Formatting.Indented'(see below). //If you don't do it, you will get the object serialized in one line. //Where with `Approvals.VerifyJson(jsonAddress);` you get the formatting for free. //As always, use whatever gets the job done quickest. var jsonAddress = JsonConvert.SerializeObject(address, Formatting.Indented); Approvals.Verify(jsonAddress); */ // few other cool features I'd like to use when the scenario calls for it. // Approvals.VerifyHtml(htmlString); // Approvals.VerifyPdfFile(pdfFilePath); // Approvals.VerifyXml(xmlString); } } }
On First Run of Approval Tests
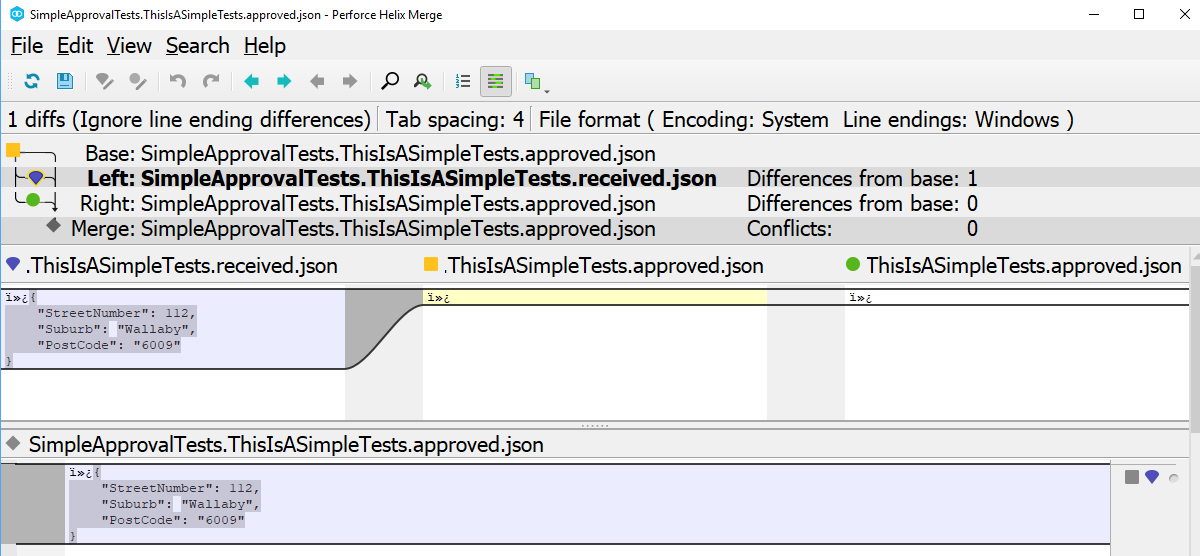
When you run the test the first time, the diff tool will pop up showing two file:
*.received.* - This is the actual result when your code was run.
*.approved.* - This is the expected result, the first time it will be empty as you still have to decide what is expected content.
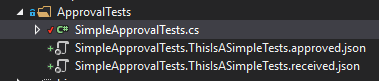
You will also see two new files in your project. In my example I verified json results Approvals.VerifyJson(jsonAddress), hence .approved.*json**. It could be different depending on your Approvals.VerifyX method used.
The *.approved.* file is the one you want to add to your source control. Think of it as your test’s answer sheet. The content saved in that file will be used by the Approval Test library to verify the actual result.
Create Content For Approved File
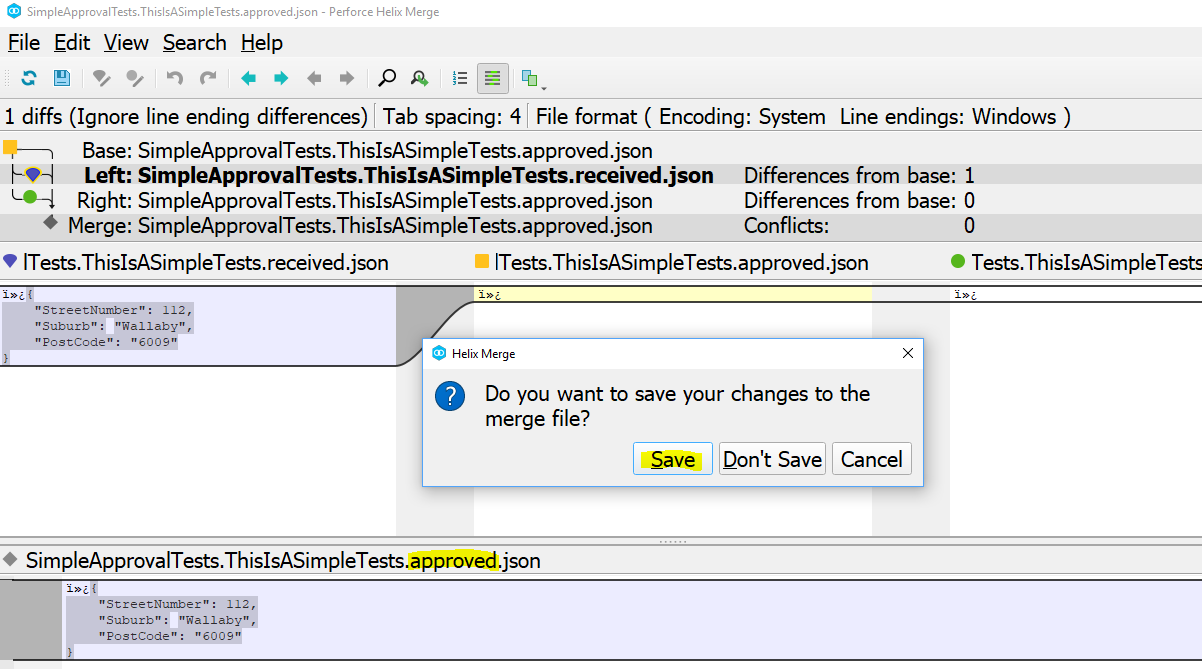
How do we create the *.approved.* content?
Easy - you simply close your diff tool and it will prompt you to save the differences from the actual result into the*.approved.* file.
Now that you’ve saved the file, you have a valid *.approved.* file.
When you re-run your test, it will pass and the *.received.* file will automatically be removed by the Approval Tests library.
With a green test, we can commit the *.approved.* file with confidence to source control.
Test Workflow:
make changes to your code
update test, if required
run your test - let’s assume failed test
*.approved.* was created file
*.received.* was created file
diff tool will shout mismatch
save the change to the *.approved.* file
re-run your test
on green test, add/commit *.approved.* changes
on green test, *.received.* was automatically removed
new code is now covered
Suggestion: Configure your source control to ignore files with matching pattern *.received.*. I’ve added *.received.* to my .gitignore file.
Approval Tests In Action
Conclusion
Approval tests are available in many flavours - C#, VB.Net, Java, PHP, Ruby or NodeJS. A quick google will help you out.
I was very happy with the results Approval Tests brought to our project and would definitely recommend it for consideration in your next eyeball scenario.
]]>
<p>(Tech: C#)</p>
<h2 id="Problem"><a href="#Problem" class="headerlink" title="Problem"></a>Problem</h2><p>I was working on a project where
Apply Builder Pattern to Unit Testshttps://ruanbeukes.net/Apply-Builder-Pattern-to-Unit-Tests/2019-04-25T16:12:29.000Z2023-03-25T06:45:35.686Z(Tech: C#)
Problem
I was working on a team (Team-B) where we were tasked with writing tests for a new implementation of the codebase. The old implementation was fully covered, and our mission was to mimic the old tests in the new ones.
Sounds fairly simple, butttt…
The codebase is owned by another team (Team-A), and they have not contributed to the new implementation.
*How do we create unit tests which will speak to Team-A when they read the new tests from the imposters? :) *
Use the Builder Pattern
Here’s wikipedia’s definition on the builder pattern:
The intent of the Builder design pattern is to separate the construction of a complex object from its representation. By doing so the same construction process can create different representations.
Because Team-A doesn’t have the knowledge of creating valid data objects for the new implementation, we used the builder pattern and created methods to abstract away the complex data structure setup.
Think of it from this point, if someone else wants to add more tests they should not have to dig deep into business logic on how to create a valid object. There should be a method they can call, and they will get a valid object every time.
One advantage I found was; the longer we worked on the test suite, the faster we got. This was because we started re-using builders created by other team members.
When I wanted to get a complex object in a valid state before I focus on my test, I’ll simply “new up” a builder and look for some interesting method on it. If not found, I knew it was a new scenario and method to be created.
Let’s look at some samples.
Samples
Disclaimer: These are all fictional - apply the principle and don’t get too bogged down in the example :)
Let’s say another team is tasked with creating an Employee validator. This team has no idea on how to create a valid employee. Luckily another awesome team has created EmployeeBuilder, which they can re-use and focus on the logic of testing the validator.
Here is a requirement: An employee is valid when any address has an Australian postcode
Let’s dream up some test code for the employee validator…
[Fact] publicvoidEmployeeValidatorTests_EmployeeAddressShouldBeVALIDWhenAnyPostCodeFromAustralia() { // arrange var builder = new EmployeeBuilder();
// no need to worry on how an Australian employee is created. // imagine a very complex object here, with a lot of setup under the "With" method. var employee = builder.WithEmployeeFromAustralia() .Build();
// act //system under test var sut = new EmployeeValidator(employee);
// assert // team focus on testing validator logic, // not spending time figuring out how to create a complex employee object. sut.IsValidAustralianAddress().ShouldBeTrue(); }
public class BuilderBase<TBuildResult, TBuilder> : IBuilder<TBuildResult, TBuilder> where TBuildResult : class, new() where TBuilder : class, IBuilder { protected TBuildResult _concreteObject = new TBuildResult();
public TBuildResult Build() { return _concreteObject; }
public TBuilder With(Action<TBuildResult> setAction) { setAction?.Invoke(_concreteObject); returnthisas TBuilder; }
public TBuilder With<TRequestBuilder>(Action<TBuildResult, TRequestBuilder> setAction) where TRequestBuilder: class, IBuilder, new() { setAction?.Invoke(_concreteObject, new TRequestBuilder()); returnthisas TBuilder; } }
publicinterfaceIBuilder { /* maker to indicate a builder object */ }
public interface IBuilder<TBuildResult, TBuilder> : IBuilder where TBuildResult : class, new() where TBuilder : class, IBuilder { TBuildResult Build();
///<summary> /// A generic way to set properties ///</summary> TBuilder With(Action<TBuildResult> setAction);
You’ll notice I have TBuilder With(Action<TBuildResult> setAction) on the BuilderBase class.
It allows me code like this:
1 2 3 4
var builder = new EmployeeBuilder();
var actual = builder.With(x => x.Name = "Samurai Jack") .Build();
I like it because one can easily see from the test what the intent is. Abstracting this away into a method will hide the fact that the Name property changed.
There is also TBuilder With<TRequestBuilder>(Action<TBuildResult, TRequestBuilder> setAction) where TRequestBuilder : class, IBuilder, new() on the BuilderBase class.
It allows me code like this:
1 2 3 4 5 6 7 8
var builder = new EmployeeBuilder(); var employee = builder .WithEmployeeFromAustralia() .With<AddressBuilder>((e, addressBuilder) => e.Addresses.Add(addressBuilder .WithSouthAfricanAddress() .Build()) ) .Build();
My suggestion would be to have all builder classes only in your test project. No need to have builders in production code as the data will come from the real source.
This is more in-depth “framework” and something I will definitely use on bigger projects. If I needed more complex logic in my current implementation of the BuilderBase, I’ll upgrade to Dossier no questions asked.
TestStack.Dossier provides you with the code infrastructure to easily and quickly generate test fixture data for your automated tests in a terse, readable and maintainable way using the Test Data Builder, anonymous value and equivalence class patterns.
Conclusion
All the logic of creating complex objects is kept in one place, will help with future maintenance. Writing tests in a fluent way makes the test more readable and also shows testing intent better. Writing tests got faster as the builders library grew. Cross functional teams don’t need the in-depth knowledge of a specific area, if there is a builder they can focus on their tasks.
I had fun using the builder pattern to create data objects in a fluent(ish) way for unit testing. Will use it again in future.
Use it…don’t use it :)
]]>
<p>(Tech: C#)</p>
<h2 id="Problem"><a href="#Problem" class="headerlink" title="Problem"></a>Problem</h2><p>I was working on a team (Team-B)
VSCode Multiline Editing Magic https://ruanbeukes.net/VSCode-multiline-editing-magic/2019-04-12T21:32:46.000Z2023-03-25T06:45:35.698ZI used Visual Studio Code’s multiline editing today and was pleasantly surprised.
This feature is available in a few editors, pick your favorite one and be more productive :)
Use it…don’t use it :)
]]>
<p>I used <a href="https://code.visualstudio.com/" target="_blank" rel="noopener">Visual Studio Code’s</a> multiline editing today and was p
Add Angular Tests to Netlify Deploymenthttps://ruanbeukes.net/Add-Angular-Tests-to-Netlify-deployment/2019-03-13T08:15:43.000Z2023-03-25T06:45:35.686ZFor quite some time, Netlify has been my (free) tool of choice to deploy my blog and other personal projects. It’s very simple to set-up and their documentation is also easy to follow.
But how do you make your Angular tests part of the Netlify build pipeline?
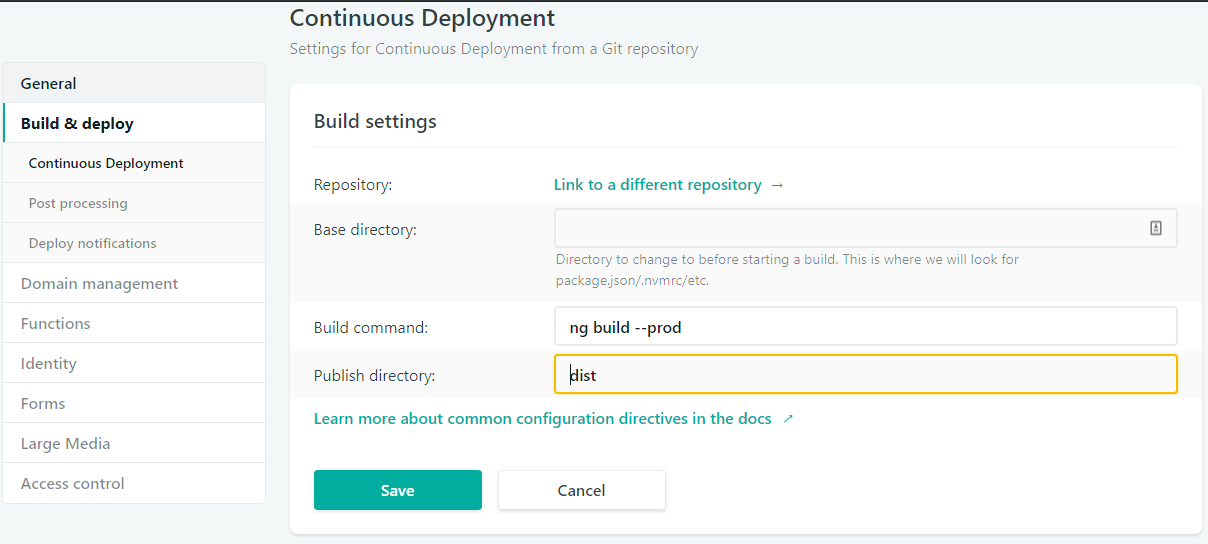
Most of the examples suggest: Build command: ng build --prod What I need: Build command: ng test && ng build --prod
My first issue, ng test creates an instance of Chrome browser as specified in the karma.conf.js. Pretty simple to solve, run Headless Chrome.
But how do I get Headless Chrome installed on Netlify’s Linux build environment? Puppeteer.
I’ve tested everything locally and Build command: npm run-script test-headless && npm run-script build executed successfully in my Windows environment.
After I’ve pushed the new changes, the build failed - “CHROME_BIN” env variable error.
1 2 3 4 5 6 7 8 9 10 11 12
{"os":"linux","arch":"x64"}) 11:33:41 AM: audited 34037 packages in 15.642s 11:33:41 AM: found 0 vulnerabilities 11:33:41 AM: > beukes-bunch-health-tracker@0.0.0 test /opt/build/repo/ui 11:33:41 AM: > ng test 11:34:02 AM: 10 03 2019 03:34:02.050:INFO [karma-server]: Karma v4.0.1 server started at http://0.0.0.0:9876/ 11:34:02 AM: 10 03 2019 03:34:02.053:INFO [launcher]: Launching browsers ChromeHeadless with concurrency unlimited 11:34:02 AM: 10 03 2019 03:34:02.060:INFO [launcher]: Starting browser Chrome 11:34:02 AM: 10 03 2019 03:34:02.061:ERROR [launcher]: No binary for Chrome browser on your platform. 11:34:02 AM: Please, set "CHROME_BIN" env variable. 11:34:02 AM: npm 11:34:02 AM: ERR! Test failed. See above for more details.
Seems like karma is looking for the path of the chrome executable.
Second issue, how do I set CHROME_BIN env variable path?
Thanks to the folks at Puppeteer they made it easy by just checking the build logs:
]]>
<p>For quite some time, <a href="https://www.netlify.com/" target="_blank" rel="noopener">Netlify</a> has been my (free) tool of choice to d
When Your Tests Are at the Mercy of Your Databasehttps://ruanbeukes.net/When-your-tests-are-at-the-mercy-of-your-database/2019-02-20T07:40:00.000Z2023-03-25T06:45:35.698Z(Tech: C#, Microsoft SQL)
Recently I was investigating a bug which kept me, and a few of my mates, occupied way longer than we are willing to admit :)
One summer’s morning
It started on a fresh summer’s morning…
After I’ve completed my code changes, like a very good software citizen, I ran the project’s unit tests. They were all green and I was riding the wave of success, nothing could stand in my way today…I’m flying through my work. Last formality is to create a Pull Request and wait for the build server to succeed before reviewers will approve my changes.
Life…is…easy, everything is in harmony.
Until I received an email from the build server - Failing tests. Wait…what?!?!? They were all green locally, surely this can’t be right. I kicked off another build, now they pass. Kicked another build, now they fail. Kicked off yet another build, failed again. This carried on a few more times with the hope I’ll find a pattern, no luck.
It was very strange as my changes did not relate to the failing tests.
I then realized it was one of those “fun” intermittent failing tests.
And so my investigation was born…
Investigation
I set my acceptance criteria to 5 successful consecutive builds.
I had two failing tests. In short, the tests set a property and then saved that property to the database.
1 2 3 4 5 6 7
publicvoidThenInvoiceCommentIsStored() { var invoices = GetInvoices(); //retrieving actual database data //assert invoices.Lines[0].Comment.ShouldBe("Hello World"); //sometimes fails here }
The verification failed when that property was expected to have a string value but the actual value was null.
Example:
1 2 3 4
invoices.Lines[0].Comment should be "Hello World" but was null
Usually when I have intermittent failing tests, past experience taught me dates/times/timezone are involved. In my case, none of those were present.
I’ve checked server build plans, added debugging messages, second guessing frameworks we used (long shot, I know), adding delays to check race conditions and a few other ridiculous ideas not worth mentioning.
None of my plans worked.
The investigation was a very slow and painful process as every code change took 5 minutes to build.
Die bug, die!
I decided to turn my focus back to the origin of the problem, the failing tests. I zoomed in on the one particular test - ThenInvoiceCommentIsStored.
By looking at the test, the intent is to assert the first element in the list. I’ve added a breakpoint and discovered there were actually two items in the Lines list.
Hypothesis: Is it possible we updated the data correctly but the list is only in the wrong order?
I changed the test to find the Line item by ID (filter), rather than the first element in the Lines list.
1 2 3 4 5 6 7 8 9
publicvoidThenInvoiceCommentIsStored() { var invoices = GetInvoices(); //retrieving actual database data //assert //_expectedLineID was set before the actual assertion eg: 88 var specificLine = invoices.Lines.Single(x => x.Id == _expectedLineID); specificLine.Comment.ShouldBe("Hello World"); }
BOOM, the beast was slain…5 successful consecutive builds!
Solution Explained
The actual problem was a mistake in the test.
The test indicated we expect the first element in the list to change. That holds true, so long as there is only one item in the list. As soon as we have two items in the list, then we have to investigate sort order.
The extra data silently changed the test.
Because we query the data directly from the database, with no sort order, the database will return the records based on its default sort order.
Our tests were at the mercy of the database sort order.
Usually the database’s default sort order is based on a table’s Primary Key.
In our case, Lines.ID was the Primary Key and was of Data Type uniqueidentifier (GUID).
Example: Two Line records were added in exactly this order but with only one digit difference:
488d6b1a-898e-4a13-acb3-a9e500d66962 (sample only, GUIDS are unique) 288d6b1a-898e-4a13-acb3-a9e500d66962
On a query of the data, even though the data input was done with 4xxxxxxx-xxxx-xxxx... first, 2xxxxxxx-xxxx-xxxx... will always show up first because of the Ascending Primary Key sort order [ID] ASC.
Query:
1
SELECTIDFROMLines
Result:
1 2 3
ID 288d6b1a-898e-4a13-acb3-a9e500d66962 488d6b1a-898e-4a13-acb3-a9e500d66962
This had a devastating impact on the server unit tests as we had intermittent test failures. In some cases we were lucky and the GUID order worked out well for asserting the first element in the Lines list, other times the updated Line item was somewhere in the list.
What about the green local tests?
I’m still unclear as to why they passed.
The only difference being that on the server, the database is created every time. Locally, the database is created only the first time you run the unit tests.
I decided to let this one go as the change fixed the server build and locally the tests still passed.
My initial mission was completed.
What I have learned?
Write your tests with more intent. Your test must speak to future you about what you were trying to test. When you look back at code you’ve written 3 months ago, you will thank the past you :)
Perseverance - failure was not an option. The longer the problem dragged out, the more drive I had to fix the bug. Once you’ve invested so much time in an issue, the victory is so much sweeter.
Use it…don’t use it :)
]]>
<p>(Tech: C#, Microsoft SQL)</p>
<p>Recently I was investigating a bug which kept me, and a few of my mates, occupied <em>way</em> longer th
Angular Typesafe Reactive Forms With TypeScripthttps://ruanbeukes.net/Angular-Typesafe-Reactive-Forms/2017-10-28T17:42:06.000Z2023-03-25T06:45:35.670Z(Update - March 2020 I finally created a npm package angular-typesafe-reactive-forms-helper)
Problem
Working with more complex Reactive Forms, it was challenging to remember how the form was bound to my FormGroup object.
I wanted intellisense to help me.
This is because the FormGroup class has a ‘value’ property which returns ‘any’, the cause of my frustrations.
Good luck renaming property names!
1 2 3 4 5
//my dream and challenge get value: CustomType; // <-- somehow the angular code must return a CustomType
//from Angular FormGroup class get value: any;
Another frustration I faced was referring to the form properties names as ‘string’ values. It quickly got out of hand when I renamed property names.
1 2 3 4 5 6 7 8
//example of usage this.form.get('heroName').patchValue('He-Man');
//my dream and challenge this.form.get(x => x.heroName).patchValue('He-Man');
//from Angular FormGroup class get(path: Array<string|number>|string): AbstractControl|null
Angular team is considering implementing Typesafe Reactive Forms
Search for TypeSafe Reactive Forms Changes to find all the changes. I commented out the original angular code and replaced it with the Typesafe way as a quick reference.
this.heroForm = this.fb.group<IHeroFormModel>({ name: new FormControl(''), secretLairs: new FormControl([]), power: new FormControl(''), sidekick: new FormControl('') });
this.form = this.fb.group<ICustomerModel>({ name: new FormControl(null, [Validators.required]), address: this.formBuilder.group<IAddressModel>({ suburb: new FormControl(''), postcode: new FormControl('', [Validators.required]), }) });
Benefits TypeScript provide:
Detecting errors (contract mismatch): Let’s say we change the ‘name’ property, ‘name’ => ‘nameNew’, but the IHeroFormModel.name did not change, TypeScript will raise the alarm.
Renaming properties: Super easy, I’m using VSCode and it’s as easy as F2, rename the property, enter…and TypeScript will do the rest. No more search and replace.
No more misspelled properties: Intellisense ensures you get the correct property name everytime. With string property names a mistake can easily creep in.
Guidance on how to create the form group: Code sample below will have TypeScript raise the alarm when attempting to set ‘name’ to ‘’, FormGroupControlsOf<T> returns FormControl | FormGroup.
message: ‘Argument of type ‘{ name: string; secretLairs: FormControl; power: FormControl; sidekick: FormControl; }’ is not assignable to parameter of type ‘FormGroupControlsOf‘. Types of property ‘name’ are incompatible. Type ‘string’ is not assignable to type ‘FormControl | FormGroup’.’ at: ‘1, 49’ source: ‘ts’
1 2 3 4 5 6
this.heroForm = this.fb.group<IHeroFormModel>({ name: '', secretLairs: new FormControl([]), power: new FormControl(''), sidekick: new FormControl('') });
formatAddressToOneLine(addressIndex: number) : string { //When using angular's FormGroup no intellisense is provided //when typing 'this.heroForm.value.'. //The FormGroupTypeSafe form will give you intellisense. //The benefit is when you rename property names, //TypeScript will make sure you change all the references //old code => this.heroForm.value.secretLairs[addressIndex] returns 'any', //then use 'as Address' to get it to be an Address object for intellisense to work //let address = this.heroForm.value.secretLairs[addressIndex] as Address; //No more 'as', TypeScript knows it is an Address let address = this.heroForm.value.secretLairs[addressIndex]; return address.street + ", " + address.city + ", " + address.state; }
* app/angular-reactive-forms-helper.ts *
In order to make this work as closely as possible to the angular way I created an abstract class FormGroupTypeSafe<T> which derives from angular’s FormGroup. It also ensures that exisitng code will not break. I also created two functions: getSafe, setControlSafe. Those were the only functions I needed for the Typesafe Angular Reactive Forms Sample. If you need more, add them :)
I don’t misspell property names anymore and refactoring Reactive Forms is back to being a trivial task. I think the extra bit of ceremony is absolutely worth it.
Use it…don’t use it :)
]]>
<p>(Update - March 2020 I finally created a npm package <a href="https://www.npmjs.com/package/angular-typesafe-reactive-forms-helper/" targ
Build a Static Secure Blog With Hexo and AWS S3https://ruanbeukes.net/BuildStaticBlogWithHexo/2016-07-28T23:00:34.000Z2023-03-25T06:45:35.666ZIn this post I will focus on the steps I took to make my first post publicly available as opposed to spending time on how to customise your blog.
First thing I did was to register a personal domain name - ruanbeukes.net.
Easiest is to google ‘domain registrars’ for heaps of choices. Choose the very first one in the list and start exploring with domain names. Once you have identified your available domain name, you are ready to explore other registrars to compare prices.
When the price suits, and you have read a few online reviews about your new registrar, sign up to purchase your domain name.
I pay AUD$11.50 annually.
* Add Privacy Protection and protect yourself from spam and scams when purchasing your domain. *
Think of your domain name as an entry in the yellow pages where someone can lookup your phone number. I do not want my personal details publicly available. You can make it private by adding Privacy Protection.
I pay AUD$7 annually.
If you have concerns about your personal details, use whois and enter your domain name.
Register a AWS account to host your blog
Go to Amazon Web Services (AWS) and create a free account. You will need a credit card to register. Fill out your credentials and sign up for a Personal Account.
Amazon bills you when you exceed their free usage deal. It works on a ‘Pay-As-You-Use’ model and is really cheap. They have plenty of services to choose from but I use their S3 feature for my blog.
Create AWS S3 (Simple Storage Service) bucket
Amazon S3 gives you secure, durable and highly-scalable cloud storage. Login to your AWS account and find the S3 service under the Services menu.
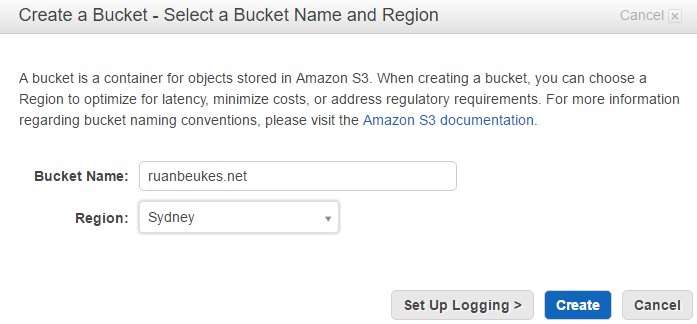
Hit the Create Bucket button and it will prompt you with a Bucket Name and Region.
* Bucket Name must be your domain name. * The Region should be the one closest to your location.
Create your bucket!
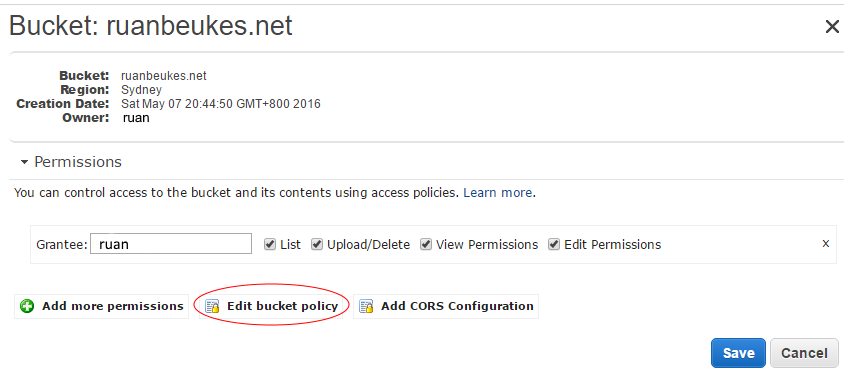
** Permissions: ** Go to the Properties of the bucket and expand Permissions, click on the Edit bucket policy.
{ "Version": "2012-10-17", "Statement": [ { "Sid": "Allow Public Access to All Objects", "Effect": "Allow", "Principal": "*", "Action": "s3:GetObject", "Resource": "arn:aws:s3:::{YourBucketNameHere}/*" } ] }
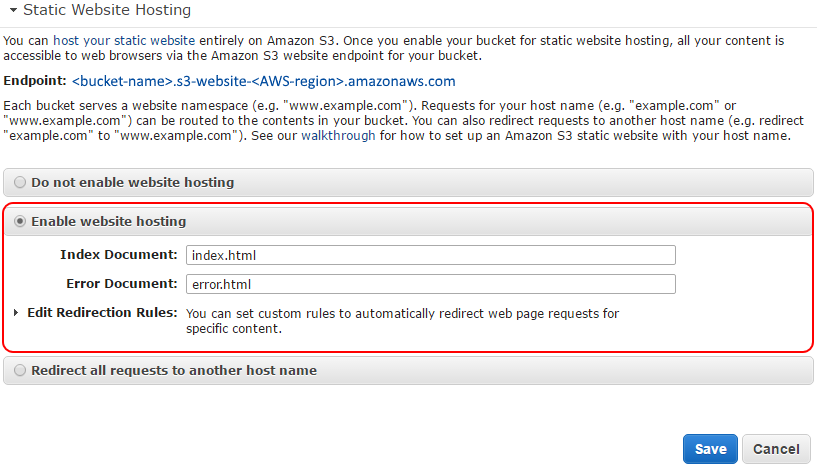
** Static Website Hosting: ** Go to the Properties of the bucket and expand Static Website Hosting, enable website hosting.
Add Index Document - index.html. Optional to add Error Document - error.html. The Endpoint is the link you should use if you don’t have a domain name registered. Note - The bucket endpoint is also used by CloudFlare later in this post.
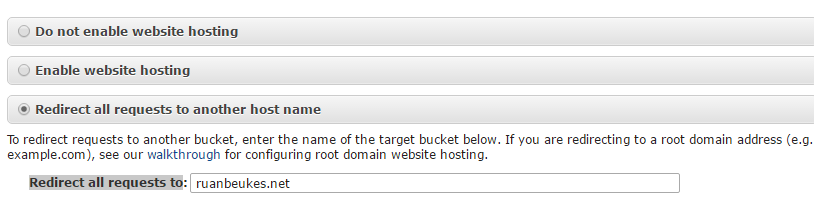
** Create ‘www’ sub domain bucket and redirect to domain ** I also created a www.ruanbeukes.net bucket which points to ruanbeukes.net.
Create the www.{YourDomainName} bucket and go to its Properties and expand the Static Website Hosting. Select the ‘Redirect all requests to another host name’ option. Fill out the ‘Redirect all requests to’ text box with the domain bucket name.
The AWS help documentation is very good. There is always a ‘Learn more’ link on the option I explored which explained in detail what the setting or section is all about.
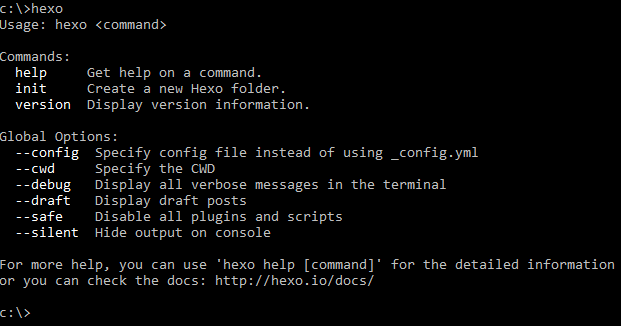
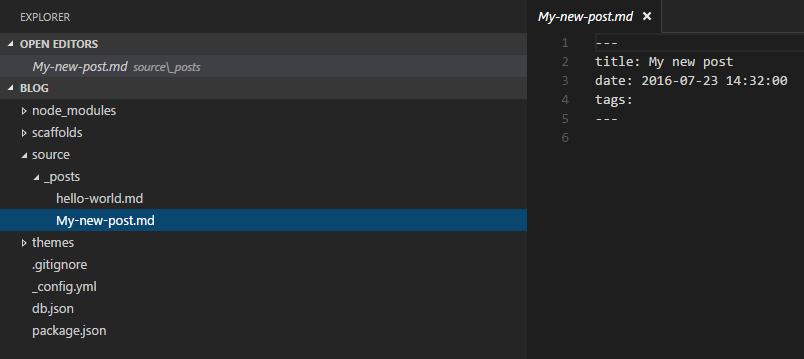
Hexo creates a Mark Down file with a Title, Date and Tags. Now your file is ready for your content. Check out the Hexo documentation on how to use and change the header settings.
When you’ve create your ‘Hello World’ post and you are ready to deploy to the server, I run the ‘Generate’ command.
1
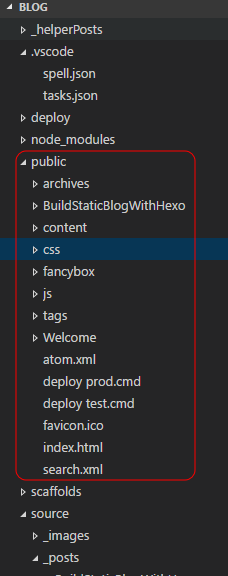
$ hexo generate
It creates the output in the Public folder eg:
Run the hexo server and test your blog.
There are many more commands you can use. I only covered the ones I use regularly.
Publish to AWS S3 bucket via AWS CLI tool
Easiest way to publish files to your S3 bucket is to login to AWS, go to S3 services, use the web UI ‘Actions’ button and select ‘Upload’. After a while it becomes a tedious repetitive job, so I researched their CLI tools - AWS CodeCommit Command Line Reference.
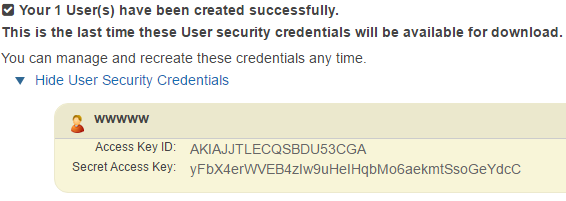
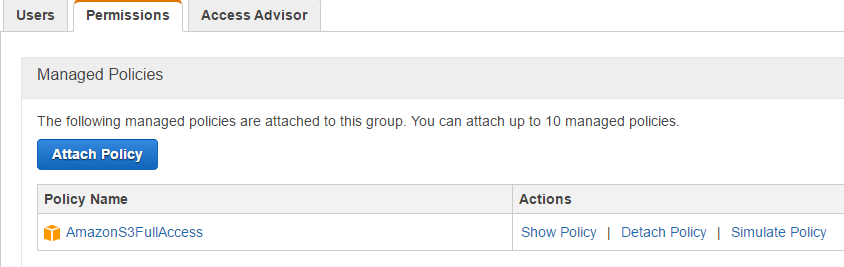
** Configure Security Keys for CLI tool ** Go to AWS IAM (Identity and Access Management) manage console. This is where you create users and groups.
I’ve created a new user. The new user has a Access Key ID and a Security Access Key. Keep the Secret Access Key safe as it is used for authentication to S3 buckets.
I also created a group with a Permission Policy of AmazonS3FullAccess and added the user to that group.
Then, open a command prompt and run to configure CLI security
1 2 3 4 5 6
aws configure

AWS Access Key ID [None]: AKIAJJTLECQSBDU53CGA
AWS Secret Access Key [None]: yFbx4erWVEB4zlw9uHelHqbMo6aekmtSsoGeyDcC
Default region name [None]: {YourRegionName}
Default output format [None]: json
AWS Access Key ID [None]: Type your target AWS access key ID here, and then press Enter AWS Secret Access Key [None]: Type your target AWS secret access key here, and then press Enter Default region name [None]: Type us-east-1 or any other region here, and then press Enter Default output format [None]: Type json here, and then press Enter
You can test your config with ‘ls’ command. This should list all your buckets on S3.
** Create batch file to run CLI with ‘sync’ command ** I use the ‘sync’ command to copy and update my content. This is what I execute in the batch file
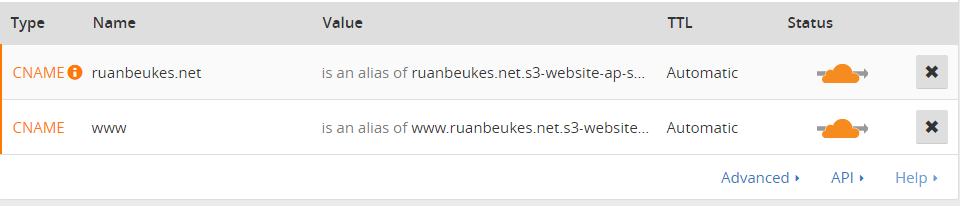
** Map S3 bucket endpoints ** Look for the Add Site menu option and add your domain name and let CloudFlare do its magic.
Add your S3 endpoints. Here is my setup…
CNAME with my domain name S3 bucket endpoint. CNAME with my sub domain S3 bucket endpoint.
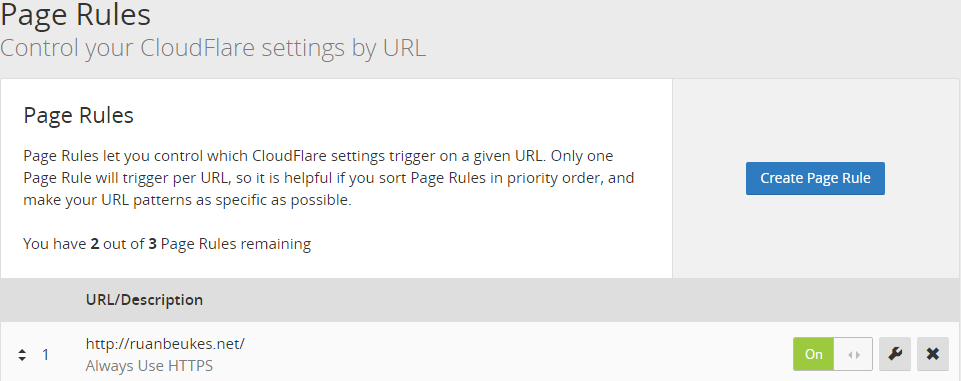
** Secure browsing ** Next, go to the Crypto menu section and make sure your SSL is set to Flexible.
Then, create a Page Rule to force HTTPS only.
The last bit is to update your domain registrar Nameservers with the two assigned to you from CloudFlare.
One thing you need to understand about these changes - BE PATIENT! I was chasing ghost a few times because of my impatience. CloudFlare suggests up to 24hrs for settings to take effect. In my case it was 2-3 hours. But still, I could have gone to bed earlier :)
So…when you’ve waited patiently, test your domain URL the next day or you can use WhoIsHostingThis to make sure hosting is done by CloudFlare.
CloudFlare has a CDN (Content delivery network) feature and will request my blog content from the S3 bucket. This is the reason why the host is CloudFlare instead of Amazon.
]]>
<p>In this post I will focus on the steps I took to make my first post publicly available as opposed to spending time on how to customise yo
It's Alive!!!https://ruanbeukes.net/Welcome/2016-07-04T19:52:18.000Z2023-03-25T06:45:35.670ZWelcome to my blog
I am happy to announce that my blog is finally up and running.
I’m getting out of my comfort zone to explore a different side of me. How else will one grow if one is not willing to try new things?
What this blog is about
I’m a Software Developer and my focus will be on web technologies. Although I love C# and .NET, there are many other server side technologies one can use. I believe you should use the right tool for the right job and I will share anything related to the web world.
More important, I will share my experiences.
Anything from a new cool tool I discovered and found very useful, to a really stupid thing I’ve done…
Hopefully those posts will be in the minority :)
We all make mistakes and if you can learn from mine, I’ve succeeded. Less bugs, better software.
So that’s it, my blog is officially alive.
In my next post I will share my incredible journey of building my blog.
]]>
<h2 id="Welcome-to-my-blog"><a href="#Welcome-to-my-blog" class="headerlink" title="Welcome to my blog"></a>Welcome to my blog</h2><p>I am h